It seems the easiest way to liven up our nails is by throwing on a coat of polish. What we fail to realize is that if not applied correctly, they can end up looking far worse than before we started. Have you ever spotted a freshly painted car, where the new shade is a slightly different tint than the original? Yeah, you get the point. Read on for ways to make your nails look clean and professional, and not become a car-wreck of their own:
DOS:
Prepare
While it may seem tedious to spend time grooming your nails, only to be brushing on a coat of polish minutes later, it holds purpose. It’s important to clip and file your nails before you begin the paint job, in order for them to look clean and fresh. With that being said, soak your fingernails in a bowl of warm, soapy water before you begin filing. Let them steep for three to five minutes, and then scrub the tops with a nail buffer. If your nails appear unkept from the get-go, you may as well stop while you’re ahead.
Start With the Basics
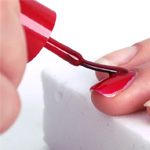
When we’re on a tight schedule, painting our nails usually involves smearing on a layer of polish overtop an old, chipping coat. To all ladies out there who’ve tried this approach, you’re probably aware this is a giant no-no. No girl wants to flaunt a set of nails that have similar texture to bumps in the road. Instead, remove all existing nail colour and brush on a fresh layer of polish to act as the base coat. This is most effective in three simple strokes: one on each side of the nail, and another steady sweep down the middle.
Give Yourself Time
If we are not victims of painting on top of old polish, the rest of us tend to carry on with frivolous tasks immediately after our last stroke. Oh, how frustrating it is to paint our nails faultlessly, only to smudge them while scrambling to find our keys. While your nails may seem dry when you give them a light tap, do not be deceived. Keep in mind: if you’ve applied more than one coat, it takes about 20-minutes for the nail polish to dry. Whether this means catching up on the latest episode of How I Met Your Mother or finishing the last chapter of a novel, use the time to relax – your other tasks can wait!
Don’t:
Colour Outside the Lines
Much like when we were younger and would become frustrated if we drew outside the lines of a colouring book, the same occurs while painting our nails. We all know getting polish on our cuticles looks amateur. The question then becomes, how do we avoid this mess? The trick is to place one side of the brush away from the cuticle, and in a fluent movement, drag the polish upward, toward the top of the nail. To avoid brushing the skin, leave a small gap on each side of the nail; this will also give the illusion that your nails are longer.
Forget the Final Touches
As previously mentioned, it’s important to have a base coat (think of it as a foundation necessary to support the higher levels), but a final coat is just as important, if not more. While your nails may already look fit for a photo shoot, it’s that extra layer of shine that will get the cameras flashing. The top coat is the layer that people notice. Whether it is a final clear glaze or a shimmering-sparkle tone, the glitz is what looks most professional. So when people start to ask what salon you got your nails painted, have your number ready to distribute.
Leave any Mistakes Untouched
If you’ve tried to paint your nails perfectly and still managed to get the bulk of polish all over your cuticles, don’t give up, there’s still an easy fix! Why waste all that hard work on one mishap? All you need is a Q-tip dipped in nail polish remover. Then, much like an eraser, blot out all those colourful marks surrounding your nail. Just make sure you remove any excess polish with a Q-tip, or else you are sure to make the damage worse.


Just have your mom or a friend paint the opposite had of your shaky side. Happy birthday!
Thnx! You really know your stuff when it comes to nails!(:
Thnx! You really know your stuff when it comes to nails!(: