Got something you want to make disappear? All you need is the right concealing product, a couple of tools and a little skill. Whether you’re battling breakouts or disguising dark circles, we’ve got you covered.
The issue: A big fat blemish
The cover-up: A creamy concealer
When you’re doing heavy-concealer duty, apply foundation first and concealer second — otherwise you risk blending away your handiwork. After applying foundation with a foundation brush or sponge, use a small makeup brush to paint the concealer right on the blemish. Work sparingly at first and then add more if necessary (if you glob the concealer on a bigger area than you need to, you’ll just make the spot more noticeable). Set with powder to help the concealer stay put all day long.
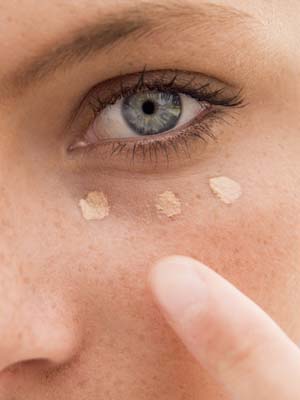
The issue: Dark circles
The cover-up: A liquid concealer
Start by blending in the area with a light layer of foundation. Choose a concealer with a light consistency (anything too heavy could look dry or settle into fine lines under the eyes), and with a slight yellow tone to offset the purple tinge of undereye circles. Just don’t go with a too-light shade, or you’ll get scary white circles around your eyes instead. Apply the concealer in dots and then gently pat with your pinky finger to blend them in.
The issue: A scar
The cover-up: A concentrated concealer
First off, make sure you’re using a moisturizer with SPF “ scars are especially sensitive to the sun and can burn much faster than healthy skin. Start by applying foundation to your entire face, and then use a concealer with a thick (almost solid or powdery) consistency. Apply the concealer precisely on top of the scar with a small brush and use your pinky finger to blend in the makeup around the edges of the scar.
The issue: Uneven skin tone
The cover-up: A primer and a full coverage foundation.
If you’ve got uneven skin tone or several problem areas, it can be tempting to just go to town with the concealer. Don’t do it — concealer looks unnatural when used all over the face, and it can even trigger breakouts. Instead, start with a primer suited to your skin type “ it will give your makeup a smooth base to stick to, and will ultimately let you use less of the stuff. Next, apply a full coverage foundation with a clean makeup brush. Finish up by dotting concealer only where you really need it and setting everything with a dusting of powder.
Tell us what you think! What are your concealer tricks? Do you have any favourite concealer brands? Let us know in the comments!

Trending
 10 Memorable Images Of Supermodel Gia Carangi (1960–1986)
  8 ‘One Tree Hill’ Quotes That Defined Our Teens
  Who Is Madonna Singing About On “Danceteria”? Every Reference Explained
  20 Celebrities Who Posed For Abercrombie & Fitch Before They Were Famous
  Fragrance Of The Month: The 7 Virtues Blackberry Lily


2 Responses
1) The Big Fat Blemish: “Paint” is an incorrect term and technique used for this method. You’ll be there all day recovering the blemish, because “painting” will just wipe away the concealer on a raised blemish.
Solution: Take your concealer brush and gently “tap” the tip of it on to the blemish, gently powder to set, and repeat. Then take your concealer brush and gently blend the edges of your concealer away if there are any.
2) Dark Circles: This technique has been around for decades and only worked on a very small demographic of women, thus it is very outdated. What may have worked in the last half of the 20th Century definately doesn’t apply in the 21st.
Lighting has changed and so has the technology going into make-ups to keep up with current technologies in film and with the demand of consumers wanting a “no make-up look” yet with all the benefits of concealing blemishes and discolourations, with SPF’s, a flawless or glowy finish that looks great under most lighting conditions that lasts all day, etc.
Liquid formulations are too light in texture for this type of concealing, even after powdering the blue undertones will still show.
Solution for Fair Skin Tones: Use a cream based blue neutralizer concealer such as Eve Pearl’s Salmon concealer (light or medium), Joe Blasco’s blue neutralizer JBBN, or Make Up For Ever’s Lift concealer in 02 (dark beige) or 03 (neutral beige).
Solution for Olive Skin Tones: Again cream based. Eve Pearl’s Salmon concealer in medium or dark, Joe Blasco’s JBSBN (Blue Neutralizer), Ben Nye’s Blue Neutralizer in NB4 or Make Up For Ever’s Lift concealer in 02 (dark beige).
Solution for Dark Skin Tones: Use an orange based cream concealer, Eve Pearl Salmon concealer in dark, or Kryolan’s Dermacolor in D30 works best.
Application: This tutourial says apply foundation first. I apply it last and after the concealer. However, most of my colleagues are 50/50 with both techniques. The bottom line is that we all achieved flawless concealed eyes with both methods during HD make-up/camera tests and on various film sets for the past few years. The trick is the amount of product to be used and mixing ratios, the steps can be interchanged. There are advantages and disadvantages to both techniques especially when it relates to applying eyeshadow, but for the sake of this tutorial I won’t make it complicated. So both methods are correct.
Focus the amount of concealer at the inner corners and blend outwards. No need to apply concealer to the last half of the eye, your blending will do it for you.
Use a concealer brush. The oils in your fingers will quickly breakdown any type of concealer. Also your fingertips are round. What happens when you drop a ball in sand? It leaves a crater. Samething happens when you use a patting technique, your fingertip (regardless if it’s your ring or pinky finger), is constantly lifting and squeezing away the concealer leaving skin unconcealed, and leaving more concealer on your fingertip, thus you’re wasting more product than you have to by reapplying more concealer than you really need.
As with all cream based make-ups, lightly powder to set it. Because the undereye area generates a lot of heat, creasing will eventually happen.
Solution: Take a clean concealer brush and use the edge to gently blend the creasing away. Do NOT apply extra powder to set it, as this will make your eyes look tired.
The rest of the tutorial is great.
Thanks for reading,
Omar